Why Chocolate Covered Oranges Is a Great Healthy Dessert
Have you ever wondered why chocolate covered oranges make such a fantastic healthy dessert? For me, it’s all about the delightful combination of flavors and textures. The juicy, tangy orange balances perfectly with the rich, creamy chocolate.
Plus, oranges are packed with vitamins and fiber, making them a nutritious choice. When I indulge in this treat, I feel less guilty knowing I’m nourishing my body while satisfying my sweet tooth.
Adding chopped peanuts gives a satisfying crunch, enhancing the experience even more. It’s a delicious way to enjoy dessert without compromising on health—what’s not to love?
Ingredients of Chocolate Covered Oranges
When it comes to whipping up a dessert that feels fancy but is super easy to make, chocolate covered oranges are a go-to in my kitchen. Seriously, who wouldn’t want to combine the zesty freshness of oranges with the rich indulgence of chocolate? It’s like having a little party in your mouth, and the best part? You can whip these up in no time.
Plus, with just a few ingredients, you’ll be amazed at how something so simple can taste so divine. Ready to gather your ingredients? Let’s plunge into it.
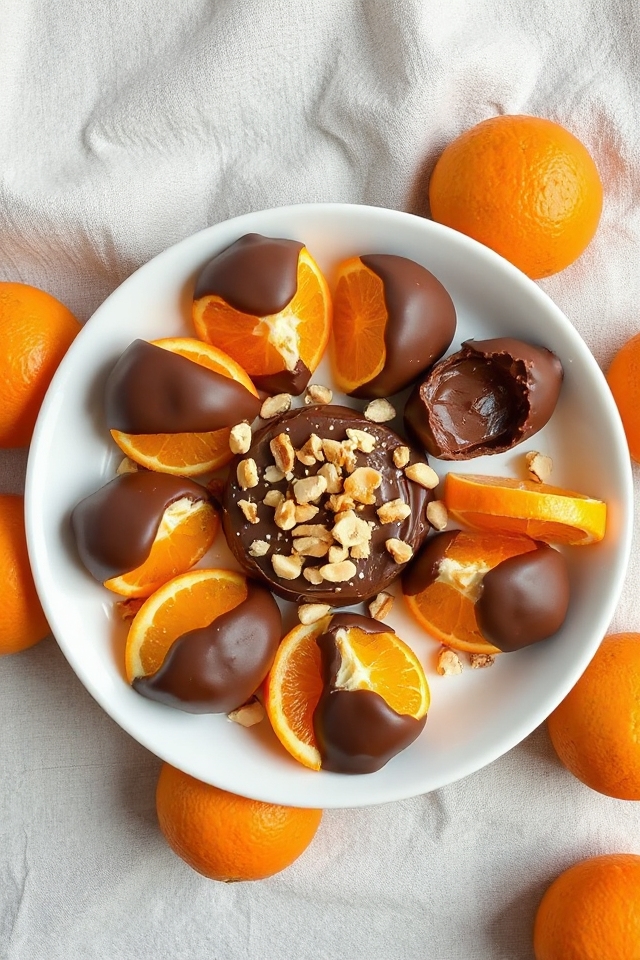
Here’s what you’ll need to make these tasty treats:
- 1/3 cup milk chocolate, chunks (I like Baker’s for this)
- 3 oranges, peeled and sectioned, and make sure to pat them dry
- 1/4 cup cocktail peanuts, coarsely chopped
Now, let’s chat about these ingredients a bit. First off, you can definitely switch up the chocolate if you want—dark chocolate would give it a nice rich flavor, or even white chocolate if you’re feeling adventurous.
Just keep in mind that the type of chocolate you choose will impact the overall taste. And as for the oranges, make sure they’re juicy and fresh—nobody wants a dry orange section ruining the party.
Those peanuts? Well, they add a delightful crunch that makes each bite a little more exciting. But if you’re not a fan of peanuts, feel free to skip them or swap them out for something else like crushed almonds or even sprinkles for a pop of color.
The beauty of this recipe is that it’s versatile, so you can make it your own. Now let’s move on to the exciting part—how to make these chocolate-covered delights.
How to Make Chocolate Covered Oranges

Alright, folks, let’s plunge into the fun part—how to whip up these scrumptious Chocolate Covered Oranges. It’s easier than you might think, and trust me, you’ll impress your friends and family without breaking a sweat.
First things first, grab your 1/3 cup of milk chocolate chunks. I’m partial to Baker’s because it melts beautifully, but use whatever chocolate makes your heart sing. Pop those chunks into a microwavable bowl and microwave them on high for about 2 minutes.
Now, here’s the trick: the chocolate won’t look completely melted when you take it out, but give it a good stir. That residual heat will finish the job, turning those little chunks into a silky-smooth chocolate sauce.
While the chocolate is melting, take your 3 freshly peeled and sectioned oranges. Make sure to pat them dry—this step is essential, or you’ll end up with a chocolate slip-and-slide that nobody wants.
Once your chocolate is ready, it’s time to dip! Grab each orange section and dip one half into the melted chocolate. Yes, it’s a bit messy, but that’s part of the fun. Place your beautifully dipped orange sections onto a baking sheet lined with wax paper.
Now, sprinkle the 1/4 cup of coarsely chopped cocktail peanuts on top because who doesn’t love a little crunch? After you’ve arranged them like the fancy dessert they are, stick that baking sheet in the fridge for about 15 minutes. This is where the magic happens—the chocolate sets, and you get to enjoy a sweet treat that’s as delightful as it’s pretty.
Once the chocolate has hardened, you can store your creations in the fridge, loosely covered, for up to 3 days. But honestly, they probably won’t last that long. You might just find yourself sneaking back for “just one more” every few hours.
And hey, if you want to get a little creative, feel free to swap out the peanuts for something else—almonds, sprinkles, or even a drizzle of caramel if you’re feeling extra indulgent. The beauty of this recipe is that it’s totally customizable, so go ahead and make it your own. Enjoy!
Chocolate Covered Oranges Substitutions & Variations
Now that you’ve mastered the art of making Chocolate Covered Oranges, let’s explore some fun substitutions and variations to elevate your dessert game.
You can swap milk chocolate for dark or white chocolate, depending on your taste. For a zesty twist, try adding a sprinkle of sea salt or a drizzle of orange-infused olive oil on top.
If you’re feeling adventurous, use different fruits like strawberries or pineapple instead of oranges. You can also experiment with toppings—coconut flakes or crushed almonds can add delightful crunch.
The possibilities are endless, so let your creativity shine in the kitchen!
What to Serve with Chocolate Covered Oranges
To enhance your experience with Chocolate Covered Oranges, consider pairing them with complementary flavors that elevate this delightful treat.
I love serving them alongside a scoop of creamy vanilla ice cream, which balances the citrusy sweetness. A splash of espresso or a rich dark roast coffee also makes for a great contrast, enhancing the chocolate’s richness.
If you’re feeling adventurous, try adding a sprinkle of sea salt on top—it really brings out the flavors.
Finally, a light, sparkling wine can add a revitalizing touch, making your dessert feel extra special.
Enjoy experimenting with these pairings!
Additional Tips & Notes
While preparing Chocolate Covered Oranges, I’ve discovered a few tips that can make your experience even better. First, make certain your orange sections are completely dry; excess moisture can cause the chocolate to seize.
I also recommend using high-quality chocolate for the best flavor. If you’re a fan of contrast, try adding a pinch of sea salt on top of the chocolate before it sets. For a colorful twist, consider using dark chocolate or white chocolate instead.
Finally, be sure to store leftovers in an airtight container to keep them fresh. Enjoy experimenting with different nuts or toppings, too!